WE'VE MOVED!!
We've decided to move our blog to our website. Please visit us here www.thecookiechew.com/blog for all our adventures in cookies! :)
Saturday, May 19, 2012
Thursday, May 17, 2012
Strawberry Champagne Cupcakes


Champagne Cupcakes:
1
1/2 cups cake flour
1
1/2 teaspoons baking powder
1/4
teaspoon salt
1/2
cup (1 stick) unsalted butter
1
cup sugar
1/2
teaspoon vanilla extract
3
egg whites
1
cup Champagne
Strawberry-Champagne
Filling:
1
cup champagne I used the barefoot pink moscato and it made it just the right
amount of sweet with no extra sugar)
2
tablespoons cornstarch
1
pint strawberries, hulled
Champange Buttercream
Frosting:
2
sticks butter, room temperature
3
cups confectioners’ sugar
1/2
teaspoon vanilla
Pinch
of salt
1/4
cup champagne
Instructions
1. Bake the cupcakes:
Preheat oven to 350 degrees F. Place cupcake liners in a muffin tin. In a bowl,
combine flour, baking powder, and salt; set aside. In a mixing bowl, beat butter
and sugar until light and fluffy. Add vanilla and beat in egg whites one at a
time. Beat in flour mixture and champagne in three alternating additions,
starting and ending with dry mixture. Pour batter into tins and bake 12 to 15
minutes, or until a toothpick inserted in the center of one of the cupcakes
comes out clean.
2. Make the strawberry
filling: Cook the champagne over medium-high heat until the mixture is reduced
by about half. Whisk in cornstarch and allow the mixture to thicken. Pour into
food processor bowl and allow to cool. Add strawberries and pulse until
combined.
3. Make the champagne
buttercream frosting: Beat butter in bowl of stand mixer until light and
fluffy. Add confectioners’ sugar 1 cup at a time, beating after each addition.
Add vanilla, salt, and champagne; beat until frosting is creamy.
4. Assemble the
cupcakes: Using a small paring knife, cut a small cone from the top of each
cupcake. Fill with a heaping teaspoon of filling. Using a pastry bag fitted
with a star tip, pipe the buttercream onto each cupcake, swirling decoratively.
Finish them off with a couple of candied strawberry chips, and serve.
Wednesday, May 16, 2012
Stuffed Carrot Cake Cookies - First Attempt at Making them Chewy
Cinnamon Almonds vs. Candied Pecans...candied pecans fo sho! My first attempt at our newest stuffed cookie taste wise turned out fabulous! However consistency and texture wise it fell a little short. I've never been a fan of cakey cookies. I just personally like my cookies dense and chewy so I always try to make my cookies in the same way I like them. In this recipe I used grated carrots, which leave a lot of the water found in the carrots in the cookie batter. I actually think I am going to juice the carrots first before putting them into the cookie batter. I am thinking it will have less moisture and therefore bake a little less cakey. I also think I am going to increase the amount of coconut to make up for the loss in moisture from the carrots. I will let you know how it goes.


 I will also testing which one I liked better...cinnamon almonds or candied pecan and the candied pecans came out so much better. I ended up cutting them up and putting them on top of the cookies before baking them. They stayed crunchy which I was very happy with and gave the top a nice crispy crunch in each bite! Delish! Now I just need to work on the texture.....keep you posted ;)


Tuesday, May 15, 2012
Tiered Cookie Cakes - Wedding Cookie Favors


Thursday, May 10, 2012
Oven thermometers...small life saver!

Wednesday, May 9, 2012
Orange Cream Cheese Cookie Squares
I can't think of anything worse that affects so many people I know....being allergic to chocolate! It just breaks my heart! ;) Well here's a recipe that even the poor unfortunate choco-phobes can enjoy. Light, fruity & not to sweet with a crunchy with cookie bottom and crumble topping. Perfect to close out the summertime and head into the fall!
1/2 cup butter
1/3 cup sugar
1 cup AP flour
1/2 cup chopped walnuts
8oz cream cheese
1 egg
1/2 cup sugar
2 tablespoons milk
1/2 teaspoon orange extract
1 canned mandarin oranges


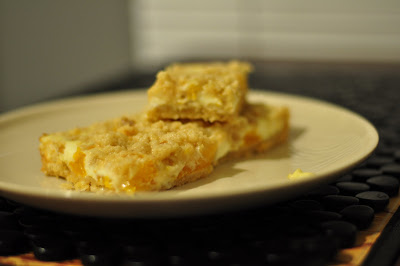
Preheat oven to 350 degrees. Beat butter & sugar together. Sift flour. Add flour & walnuts to mixture until it becomes crumbly. Pat mixture into 9 x 9 pan, but reserve some for topping. Bake crust for 12 mins.
Combine all other ingredients together, except for oranges. Remove baked crust from oven and layer mandarin oranges on top. Pour cream cheese mixture over and add topping. Bake for another 20 mins. Cool & serve!
1/2 cup butter
1/3 cup sugar
1 cup AP flour
1/2 cup chopped walnuts
8oz cream cheese
1 egg
1/2 cup sugar
2 tablespoons milk
1/2 teaspoon orange extract
1 canned mandarin oranges


Preheat oven to 350 degrees. Beat butter & sugar together. Sift flour. Add flour & walnuts to mixture until it becomes crumbly. Pat mixture into 9 x 9 pan, but reserve some for topping. Bake crust for 12 mins.
Combine all other ingredients together, except for oranges. Remove baked crust from oven and layer mandarin oranges on top. Pour cream cheese mixture over and add topping. Bake for another 20 mins. Cool & serve!
Subscribe to:
Posts (Atom)